
HOWTO: Make a Paracord Spool Rack
My general design process
2024 Dec 25
TOC
Companion Video
This article has a companion video up on my YouTube channel
Making a Paracord Spool Rack - The Scarlet Wench
Background
When I first started making whips, I was buying shorter "Hanks" of cord in the 100' length range. Occasionally, I'd also get 200' spools. These hanks and spools were fairly small and reasonably easy to manage.
However, as I've gotten deeper into the hobby, it's much more economical to buy in bulk.
To give an idea: retail, a 100' hank of 550 paracord at my local Michael's Crafts might cost $14, meanwhile, I managed to catch a sale at Paracord Galaxy the other week where I got a whole 1000' spool of white 500 Paracord for $29, and several others of various colors for $39 each (I went a bit crazy and ordered a total of 7000' actually).
These 1000' spools are a bit more bulky and a bit more difficult to manage. When pulling cord to make a whip, one needs to either kind of rest them in a convenient corner or use 2 hands to steady/control .. or find someplace to hang the spool so it unrolls freely...
Regardless of how one manages, there's also the issue that the cylindrical shapes don't lend themselves very well to stacking/storage.
My solution then was that I wanted to design and build a somewhat compact set of shafts to both store the spools and allow for easy access when I was pulling cord to make whips.
Design Considerations
Flexibility of Configuration
Since I don't have a 100% perfect idea of my exact needs/workflow, I wanted to make something that is sturdy but temporary / easy to reconfigure. I did not want to spend a fortune on part and I did not want to spend masses of time.
Materials
I settled upon Schedule 40 1/2" PVC tubing because the material itself is a little under $1 a foot and various shapes of connectors (T and L and 45degree bends) are plentiful and the T connectors (which I used almost exclusively) are available in 10 piece bulk packs at considerable savings (a single 1/2" T is about $0.80 but a 10 pack is about $5 USD).
I need it to be sturdy enough to function but reconfigurable. I did grab some PVC Glue so that I can make certain joins permanent if I wish, but right now I'm keeping it maximally flexible as I work things out.
Initial design needs
- I'd like initially to be able to hold approximately 12 1000' spools of Paracord
- It needs to be not too much trouble to rearrange the spools
- There will need to be 2 rows of "rungs" (Horizontal rods to hang the spools on)
- The less frequently used spools can be toward the back
- the less frequently used spools should still be accessible
- It should not be a nightmare to remove / add / rearrange the spools
- Two 1000' spools should be able to fit on each row
- There should be room for 3 rows of 2 spools in the front and back
- Bonus for future expansion
- It needs to be able to handle the weight
- It needs to have lateral stability so that it is self standing
- The desk where it is sitting has limited dimensions
- Needs to be less than 30" tall
- Needs a total width of 24" or less
- Should be no more than 24" deep
- There are a couple "standard" 1000' spool configurations
- 6" diameter: these are about 10" wide
- 6.5" Diameter: These tend to be about 8" wide
- (oddball) 8" diameter: these are about 4" wide
Raw Materials List
I wanted to keep maximum flexibility as mentioned above so I used T connectors even where I only want/need a 90 degree elbow - just leaving the open end free.
Therefore for the plan here my Raw materials list was:
- 6 x 5' Schedule 40 PVC pipe
- 20 x 1/2" PVC T connectors
- 2 x 1/2" PVC "Butt" Connectors (180 degree / thru joins)
Tools List
- Compound Miter Saw
- Could use a hack saw and miter or a sawzall but this was quicker and more accurate
- Rubber Mallet (optional but useful)
- "Step" Drill bit (A conical drill bit used to quickly widen holes)
- This was useful for reaming out the plastic spools a bit to make the pipes fit
- Measuring tape
- Sharpie / marker pen
Assembly
PVC Pipe Measurements
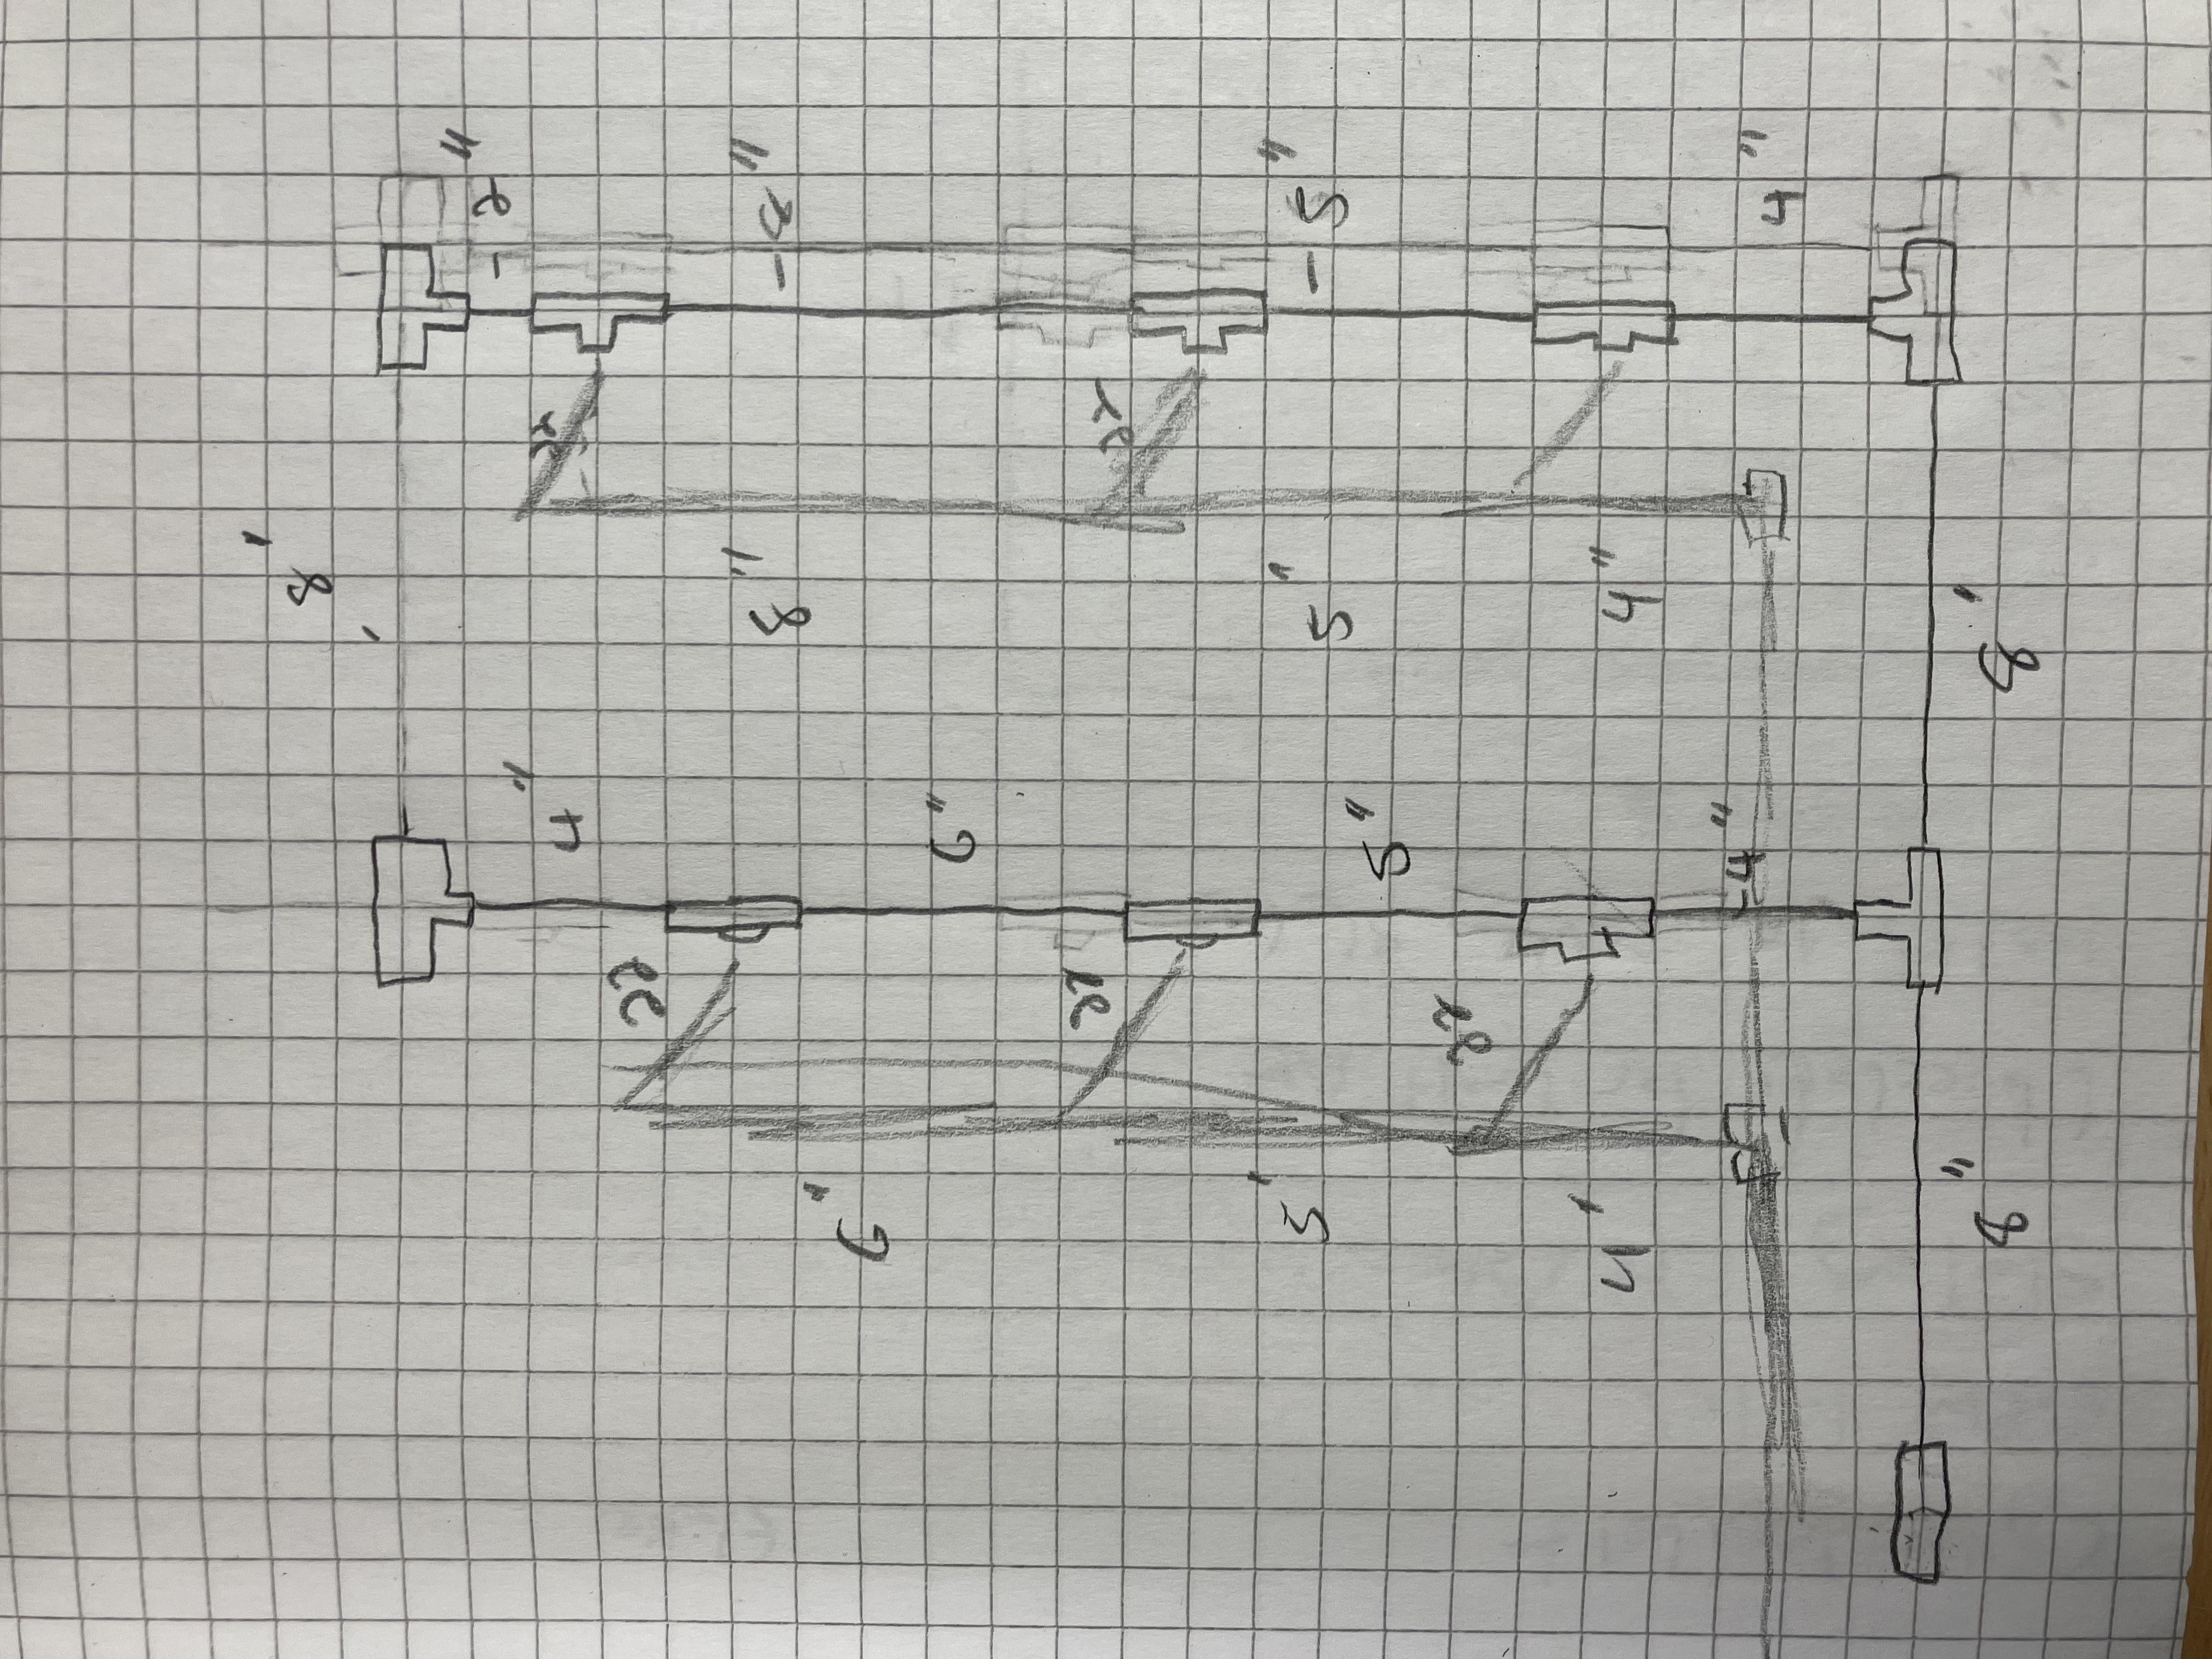
Since a T connector adds about 1" of length to a given connection, the measurements I will use are the cut lengths for the PVC Pipes.
- 6 x 22" (for horizontals)
- 7 x 8"
- 4 for base "feet" (crossmembers)
- 2 for risers
- 1 for a top connecting crossmember
- 5 x 4" risers
- 4 for bottom risers (Bottom ranks)
- 1 for a riser for final crossmember stabilizer
- 4x 5" risers
- 2 x 6" risers
- 1 x 2" connecting riser
Build
- Feet / crossmembers
- Take 2 8" sections and connect thru with one T between them
- add another T in the same orientation to 1 end
- add a straight thru to other end (see Diagram below)
- Repeat this to make a set of 2
- First Risers
- Into the 90 degree side of each T insert a 4" riser pipe
- make them all aligned (See Diagram)
- On top of the risers, add a T and then connect a crossbar between sides
- Continue with a 5" riser on top of each
- At next jump, one "ladder" will get a 6" riser and the other gets an 8"
- Finally, for a stabilizer add a 4" riser to the short side and a 2" riser to the taller
- Cap those with T connections
- add an 8" horizontal between them
Diagram (Rough Plan)
Apologies in advance for my horrible drawing skills.
Loading and Unloading
When you want to load reels, have your plan in place as it requires a little disassembly IF you are careful you can keep it connected and just eek one side out just enough to slip the rolls in.
Alternately pull the "ladder" as a whole and assemble it then stick it back on the base.
Strong Suggestion
When you unspool from a reel, the reel next to it may also catch some spin. Place adjacent reels with their "flow" in the opposing direction so that conveyed momentum will tent to not unroll the neighboring reel.
Lessons Learned / Discoveries
With 6 or 6.5" diameter reels, you need to remember that half that width is above and half is below the reel. This means that the bottom rank can be as short as a 3.5 to 4" riser from the floor. However, subsequent risers should be approx 5" (which will result in approx 7" gap due to the T connections using up 1" at each join end).
The construction of the risers /assemblies is pretty sturdy at 3 ranks / under 30" but the completion of a "connector rod" between the front and rear ranks has served to add a great deal of stability with minimal material waste.
Without glue it's actually quite sturdy and I question whether I even want to glue anything at all at this point.
As mentioned above, load the reels with their feeds in opposing directions so that any motion conveyed to the next neighbor causes the reel to "reel in" instead of reeling out making a mess.
The PVC plastic shavings from using the compound miter saw got EVERYWHERE. Even with a running vacuum dust collection system. Be prepared to get covered in little statically clingy pvc bits.
The cross stabilization at the top is not absolutely needed - it's pretty stable with the height I used - if you go taller you may find you want to incorporate additional stabilization.
Its a bit of a PITA to load the reels - plan ahead and hopefully with 1000 ' reels you won't be doing it EVERY day - if you are doing that much volume you are likely way more experienced in your workflow than I will ever be and will have a better ideas. Talk to Christopher Wright of X1 whips if you want to see a truly organized workshop.